AI-powered chicken monitoring with custom-trained YOLO models
Identify individual chickens in real time using computer vision. Built with YOLO11, FastAPI, and a live React dashboard โ self-hosted on your own hardware.
A complete, self-hosted monitoring system for your chicken coop
Processes live video from IP cameras or webcams at up to 5 FPS using optimized YOLO inference running locally on your hardware.
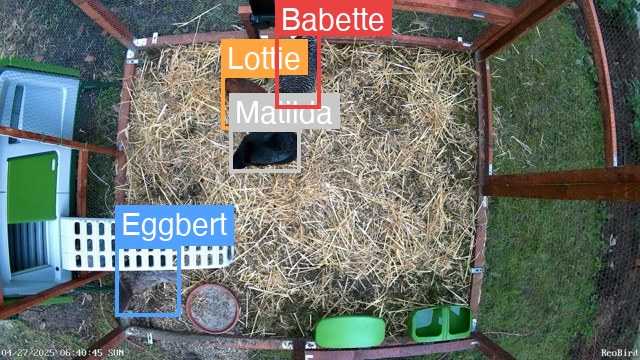
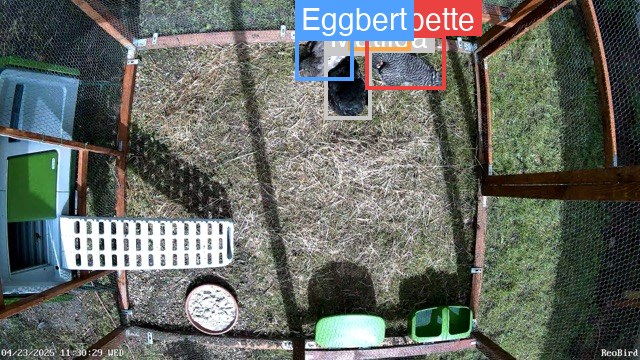
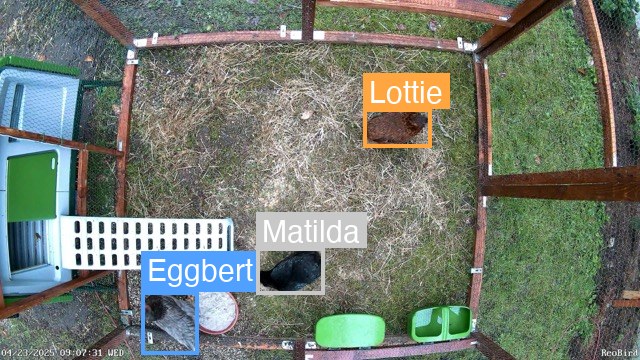
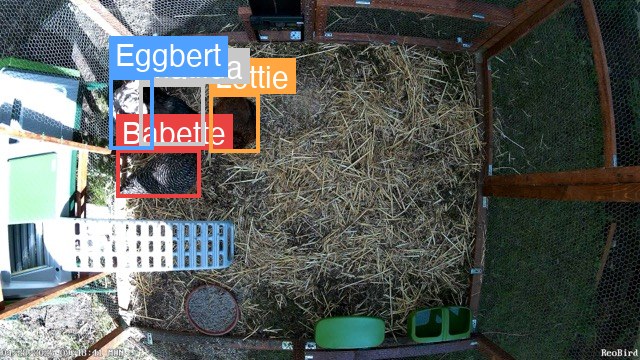
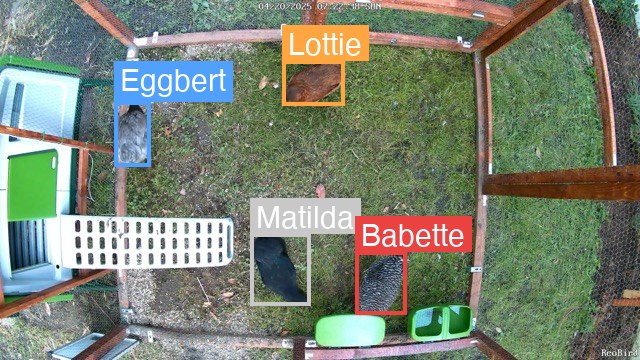
Distinguishes specific chickens by name โ Babette, Matilda, Eggbert, and Lottie โ each with a unique color-coded bounding box.
Train custom YOLO models directly from the web interface. Select your dataset, configure epochs and image size, and watch live training logs โ no terminal needed.
A React web interface streams the annotated video feed and shows each chicken's last-seen timestamp in real time via WebSocket.
Use RTSP streams, webcams, or upload video files directly from the browser. Video files loop automatically โ great for testing your model offline.
Full API with JSON endpoints and WebSocket support for building your own integrations, dashboards, or notification systems.
A React web app that shows the live camera feed with detections in real time
The left panel shows the camera feed rendered on an HTML <canvas> element. Each frame arrives over a WebSocket connection as a hex-encoded JPEG and is decoded in the browser โ no extra plugins needed. Bounding boxes and labels are overlaid directly by the backend before sending.
The right panel shows a live card for every configured chicken. When detected, the card highlights in the chicken's color and shows a confidence progress bar. When absent, a "Last seen" timestamp tells you when it was last in frame.
Every chicken has a unique color used consistently across the bounding boxes, egg icons, and name labels. When detected, the name is shown in full color. When absent, the name is struck through in grey โ so you always know exactly who is missing.
When a chicken is actively detected, the model's confidence is shown as a percentage below the name (e.g. 94%). This lets you tune the CONFIDENCE setting in docker-compose.yml or the .env file โ raise it to reduce false positives, lower it to catch more detections.
When a chicken is not currently visible, the dashboard shows the last time it was detected (e.g. Last seen: 14:32). This is tracked in React state and persists for the whole browser session โ useful for spotting if a chicken hasn't appeared all day.
A metrics panel above the video shows live performance data: current frames per second, the server-side timestamp when the frame was captured, the frontend timestamp when it was received, and the calculated end-to-end latency in milliseconds โ handy for diagnosing network or processing delays.
Real frames from the coop with YOLO bounding boxes drawn by the model
Each color corresponds to an individual chicken. Bounding boxes and confidence scores are rendered in real time. Click any image to enlarge.
A step-by-step guide to building a chicken recognition model from scratch
Record your chickens from the exact camera angle you'll use for monitoring
The quality of your training data determines the quality of your model. Use the camera in its final installed position โ the model learns the specific viewpoint, lighting, and resolution it's trained on.
Convert your recordings into individual images for labeling
Extract frames at a rate that gives enough diversity without excessive redundancy. Every 1โ2 seconds (every 30โ60th frame at 30 FPS) usually works well. Aim for 500โ2 000 images total across all chickens.
import cv2
import os
def extract_frames(video_path, output_dir, frame_interval=30):
"""Extract one frame every `frame_interval` frames."""
os.makedirs(output_dir, exist_ok=True)
cap = cv2.VideoCapture(video_path)
frame_count = 0
saved_count = 0
while cap.isOpened():
ret, frame = cap.read()
if not ret:
break
if frame_count % frame_interval == 0:
filename = f"{output_dir}/frame{saved_count:06d}.jpg"
cv2.imwrite(filename, frame)
saved_count += 1
frame_count += 1
cap.release()
print(f"Saved {saved_count} frames from {frame_count} total")
# Usage
extract_frames("coop_recording.mp4", "data/images", frame_interval=30)
Draw bounding boxes around each chicken and assign class names
Labeling is the most time-intensive step. Use a tool like Roboflow, Label Studio, or labelImg to annotate bounding boxes and export in YOLO format.
Babette, Matilda, Lottie).txt file alongside each image.txt file contains one line per object:class_id center_x center_y width height0 0.512 0.438 0.124 0.201 โ class 0 (Babette) at the given position.
Arrange files in the folder structure expected by Ultralytics YOLO
YOLO expects a specific folder layout with a central data.yaml config file. An 80 / 20 train / validation split is a good starting point.
dataset/chicken/
โโโ data.yaml โ dataset config
โโโ images/
โ โโโ train/ โ training images (.jpg)
โ โโโ val/ โ validation images (.jpg)
โโโ labels/
โโโ train/ โ training labels (.txt)
โโโ val/ โ validation labels (.txt)
path: ./dataset/chicken # root directory of the dataset
train: images/train # training images (relative to path)
val: images/val # validation images
names:
0: Babette
1: Matilda
2: Eggbert
3: Lottie
Fine-tune a pretrained YOLO checkpoint on your chicken dataset
Start from a pretrained YOLO checkpoint โ this is called transfer learning and dramatically reduces both training time and the amount of labeled data you need. The yolo11n.pt (nano) or yolo11m.pt (medium) are good starting points depending on your hardware. These base weights are not included in the repository โ Ultralytics downloads them automatically on first use. To use them in the built-in Train tab, place the downloaded .pt file into the models/ folder first.
Install the Ultralytics library first:
pip install ultralytics opencv-python
from ultralytics import YOLO
# Load a pretrained YOLO11 checkpoint
model = YOLO('yolo11n.pt') # nano โ fastest, good for most hardware
# model = YOLO('yolo11m.pt') # medium โ better accuracy, needs more VRAM
# model = YOLO('yolo11l.pt') # large โ highest accuracy, GPU recommended
# Train on your labeled dataset
model.train(
data='dataset/chicken/data.yaml', # path to your dataset config
epochs=100, # training epochs
imgsz=640, # input image size
project='/tmp/yolo_runs', # output directory
name='train',
exist_ok=True,
)
# Trained weights saved to /tmp/yolo_runs/train/weights/best.pt
# Copy best.pt into your models/ folder and select it in the Setup tab
dataset/, open the Train tab, pick your base model, set epochs, and hit Start Training. The trained model appears in the Setup model selector when done.
Check model accuracy and improve it until it performs reliably
After training, YOLO saves metrics and plots to runs/train/chickeye_v1/. Check results.csv and the generated charts for these key metrics:
from ultralytics import YOLO
# Load your trained model
model = YOLO('models/best11n.pt') # path to your trained model
# Run validation to see full metrics
metrics = model.val(data='dataset/chicken/data.yaml')
print(f"mAP50: {metrics.box.map50:.3f}")
print(f"mAP50-95: {metrics.box.map:.3f}")
# Test on a single image โ shows bounding boxes in a preview window
results = model('dataset/chicken/images/val/chicken_00007.jpg', conf=0.6)
results[0].show()
# Save predictions to disk
results[0].save(filename='prediction.jpg')
If accuracy is insufficient, common improvements:
yolo11m.pt or yolo11l.pt)Deploy ChickEye on your own hardware โ no cloud required
One command spins up all three services โ model server, streaming backend, and the React frontend behind nginx.
git clone https://github.com/yourname/chickeye.git
cd chickeye
# Optional: copy and edit environment overrides
cp .env.example .env
docker compose up --build
The dashboard is available at http://localhost:80 (or the HOST_PORT you set in .env).
# Video source โ RTSP URL, webcam index, or leave empty to configure in the UI
VIDEO_SOURCE=rtsp://user:password@192.168.1.100:554/stream
# Confidence threshold for detections (0.0 โ 1.0)
CONFIDENCE=0.6
# Class names and colors (comma-separated, must match model training order)
CLASS_NAMES=Babette,Matilda,Eggbert,Lottie
CLASS_COLORS=#ef4444,#94a3b8,#3b82f6,#f59e0b
# Active model (relative to models/ directory)
MODEL_PATH=/app/models/best11n.pt
# 0 = detection, 1 = segmentation
MODEL_TYPE=0
# Port exposed on the host
HOST_PORT=80
| Method | Endpoint | Description |
|---|---|---|
| GET | /health |
Service health check โ returns status and currently loaded model |
| GET | /config |
Active runtime config: class names, colors, video source, and model path |
| GET | /models |
List of .pt model files available in the models/ directory |
| GET | /datasets |
List of datasets in dataset/ that contain a data.yaml |
| POST | /setup |
Save configuration (video source, class names, active model) and reload the model server |
| POST | /train/start |
Start a training job in the background; accepts dataset, model, epochs, imgsz, output name |
| GET | /train/status |
Current training state: running flag, recent log lines, error, and output model name |
| POST | /upload-video |
Upload a video file to use as the video source; returns the server-side path |
| WS | /ws/video |
WebSocket stream of annotated JPEG frames with per-frame detection JSON |
Built with proven open-source tools
docker compose up.All three best11*.pt models are included in the repository and trained on the chicken dataset. Pick based on your hardware.
| Model | Size | Speed | Accuracy | Best For |
|---|---|---|---|---|
best11n.pt (nano) |
~5 MB | โกโกโก | โ โ โ | Fast CPU or any GPU |
best11m.pt (medium) |
~40 MB | โกโกโ | โ โ โ | Balanced โ GPU recommended |
best11l.pt (large) |
~51 MB | โกโโ | โ โ โ | Best accuracy โ GPU required |